While the Randy Forbes kit was obviously the largest project, it was just one of many to make this coupe the best it can be.
Exterior
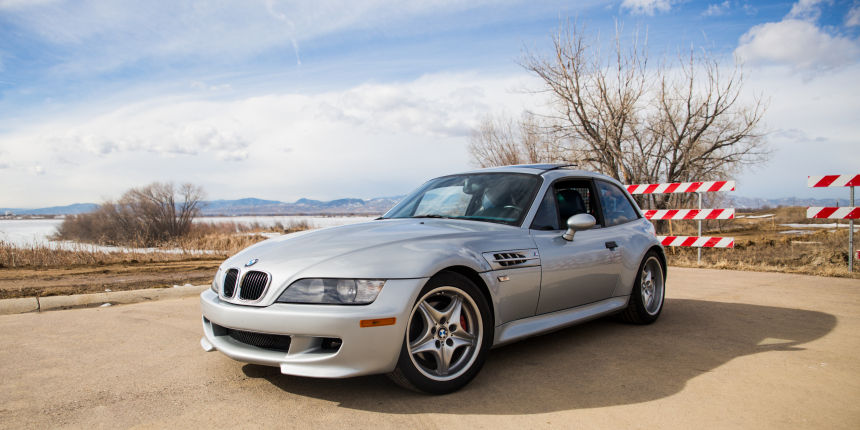
The exterior of the car was a little rough when it arrived having lived it's life inches off the ground. The front bumper was scraped along the bottom and the rear bumper had the stupid Hawaii license sticker on it that didn't come off very cleanly. We decided to repaint both just to look nice and fresh. We removed the front plate holder (available if the buyer wants it) as well as the aftermarket fog lights and associated wiring (they weren't working anyway). The cracked bumper grill was replaced with a new OEM one.
The previous owner had blacked it out with kidney grills, bumper lights and side marker lights. We replaced them all with OEM parts. We even found the proper 1999-specific kidney grills with black slats rather than chrome. Thanks Jennifer!
All of the BMW badges had been replaced with aftermarket carbon fibers roundels that were now peeling, so we re-replaced them with OEM ones that will withstand the elements a bit better. We also re-stickered all the faded "///M" badges with the kit from NeverDone.
While we were at it, we decided to have the cloudy headlights professional polished. They then applied a sealant over them to keep them from yellowing again.
Finally, the always necessary door handle gaskets. Doing them now for the 4th or 5th time, I don't understand why they seemed so difficult the first time. It's about a 2 minute job now and makes a big difference in the look of the doors.
Wheels
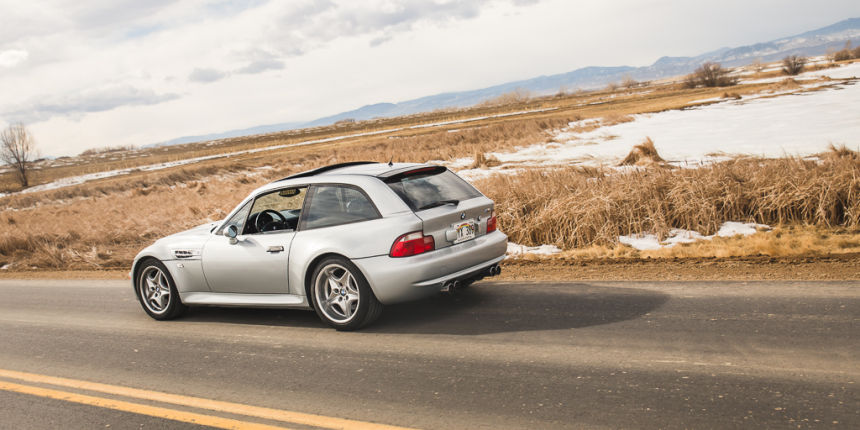
As seen in the first article, this coupe came with 19" E46 M3 wheels. They were huge with stretched tires and looked a little ridiculous in person. We were able to source a set of roadstars with tires that suit it much better. The roadstars aren't perfect showing a little rash on a couple of them, but they do look and ride a whole lot better.
Interior
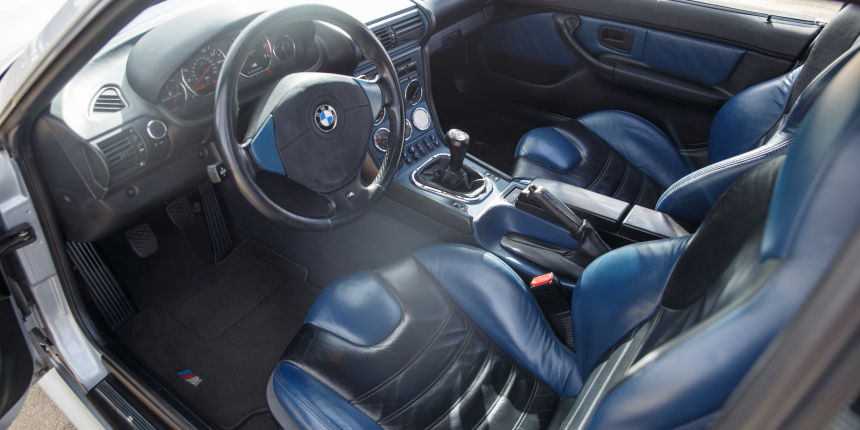
All the common interior issues were present including a sagging glove box, seats that rocked, a cloudy rearview mirror, and a worn seat bolster. All of these I had handled on previous projects. The glove box kit was a spare I had laying around, Bimmerbum provided the seat bushings, and Sybesma's quickly fixed and shipped the mirror back to me both operational and in better shape than I sent it to them. The seat took a little more work because in addition to the wear, the bolster padding had pretty much been worn out. The bottom bolster especially would just flop flat when you sat down. I had a local upholstery shop install a new pad, and went back to the Leather Doctor to fix the wear marks.
Like the previous project coupe, this one also had a sloppy feeling clutch pedal. We addressed this with some new oilite bronze clutch pedal bushings. You may remember the photo of me upside down contorted under the dash installing bushings in the white coupe. This time I was smart and did them while the seat was out to do its bushings. Highly recommended and much more comfortable.
On the more practical side, we replaced the headlight switch as the interior lights dimmer only went up halfway before the interior lights would shut off completely. This is something I've dealt with on several coupes including my own. I've read that the fuse for the switch allows too much current to reach the rheostat and can short it out.
To finish it off we replaced the aftermarket metal shift knob and handbrake with factory replacements.
Please note I readjusted the glove box again after the listing photos were taken. One of the screws inside the glove box had come loose and it was sagging a little again.
Audio
The hatch-sized subwoofer and it's equally enormous amp had been removed before we purchased the car, but all that was left was a tangle of wires and an inoperable head unit. Byron was nice enough to sell us his original head unit, amp and subwoofer box; but that was only the beginning. For anyone installing an aftermarket audio system, please leave as many as the original connectors as possible. Throwing them away is just mean to all future owners. I was able to get the connectors I needed from a coupe Mark was helping to part out. I just had to crimp 30+ wires together. I splurged and bought myself a new crimp tool, so I wouldn't dread the job quite as much. With some help from the wiring diagrams in the back of the Bentley manual, everything was put back to where it should be.
When I finally got it working, the only sound coming from the hatch was the subwoofer. The roof speakers were completely silent. Having complete confidence in my crimping ability, I figured it must be the speakers' fault. Popping off the speaker covers revealed the surrounds for the speakers, but the cones themselves had pretty much completely disintegrated. Some new 5.25" Pioneer speakers were in order. Much better!
Hatch
This was the first coupe I've ever seen to have all the carpeted hatch panels rhino-lined. While I appreciated the practical aspect of it, it never looked quite right. And because the previously installed subwoofer box was so large, the owner had removed the panels that usually cover the factory amp and subwoofer. The search was on for pretty much an entire new hatch interior. Luckily an Ebay seller parted out a coupe, and we were able to acquire the pieces we needed.
In a very cruel (but ironic) twist of fate, the only non-carpeted panels in the hatch (the subwoofer/amp covers) arrived covered in carpet. What? Before giving up on them, I decided to see if there was any hope in transforming them back to how they should have looked. I proceeded to rip off the carpet, sand off all the glue residue, fill the miscellaneous screw holes, hand sand it smooth, then painted it. If I had only known what I was getting my self into... It turned out great though, you'd never know it wasn't factory had I not told you.
The rest of the hatch panels were in great shape and installed much more easily.
Doors
When the coupe arrived, it's rear hatch button never worked quite right. It worked every time the key was inserted, but pressing the button alone was a 1 in 10 chance. I had heard of this issue before but had never had to address it personally. Popping off the interior panel of the hatch is just a matter of releasing all the little plastic buttons. I recommend having more on hand as 15 year old plastic gets pretty brittle. Exposing the mechanisms did not really help the diagnosis as everything seemed to functionally be in place. It was just the button trigger that wasn't reacting. I figured it must be something electrical. I found one place where the wire insulation had been worn through and repaired it. It actually helped making the button work 1 out of 5 presses, but that wasn't good enough. I continued to follow the wires, disconnected every connection, cleaned them, and reconnected. I'm not sure which one did it, but all of a sudden it once again worked every time. This paragraph makes it seem like short project (and it should have been), but I probably messed with it off an on for 9 months.
Sometime during my possession the passenger door lock stopped working as well. It could only be opened with the key from the outside. The inside door handle did not even work. After removing the inside door panel, I figured out the problem was that the lock actuator was not pushing the pin high enough to disengage the lock. The lock actuator was also not the factory one nor were the factory parts still there to replace it with one. I got on Amazon and found a well-rated aftermarket replacement. Installation was not difficult, but it took a while to get it in just the right spot such that it could lift the pin all the way, but not too far. In the end it performed flawlessly. If I ever replaced one again, I'd honestly probably go the aftermarket route whether or not the factory hardware was still present.
Other Stuff
Mark and his friend drove it all the way out to Colorado from California without working AC. I'm sure it would have been nice driving through the Nevada desert. We thought it might be the compressor or condenser, but it turned out to just be a large fuse in the dash. If only Mark had known... :-)
I had noticed the factory security system earlier when I had cleaned the engine bay but had forgotten about it. When I was cleaning up the interior before taking photos, I finally noticed it had the remote sensor and LED installed in the button blank behind the steering wheel where I never look. It's not here yet, but I ordered a keyless fob. I may do a YouTube video of the programming this time as it should be fairly entertaining.
The less noticeable, but still important other updates include new tie rods, control arm bushings, a right rear CV axle, O2 sensors, cam shaft sensor, an alignment, and many other little things.
As always, if you need to do any of the projects mentioned above, feel free to ask and I can tell you how I did it or what articles or videos I followed.
If you're interested in the Project Coupe, send me an email. It's going to be available very soon.